
1.1 Description
The hull and deck are constructed of fiberglass cloth, roving, uni-directional roving and matte, laminated by hand, to maximize strength and consistency through-out. Local reinforcement is added as additional laminate at the rudder post area, keel boss area (both the fillet-radius and fore and aft keel ends), chainplate area, and transom-hull corner. Additionally, a uniquely-engineered Tri-axial Force GridTM (TAFG) floor structure is bonded to the interior of the hull to significantly enhance flexural rigidity.
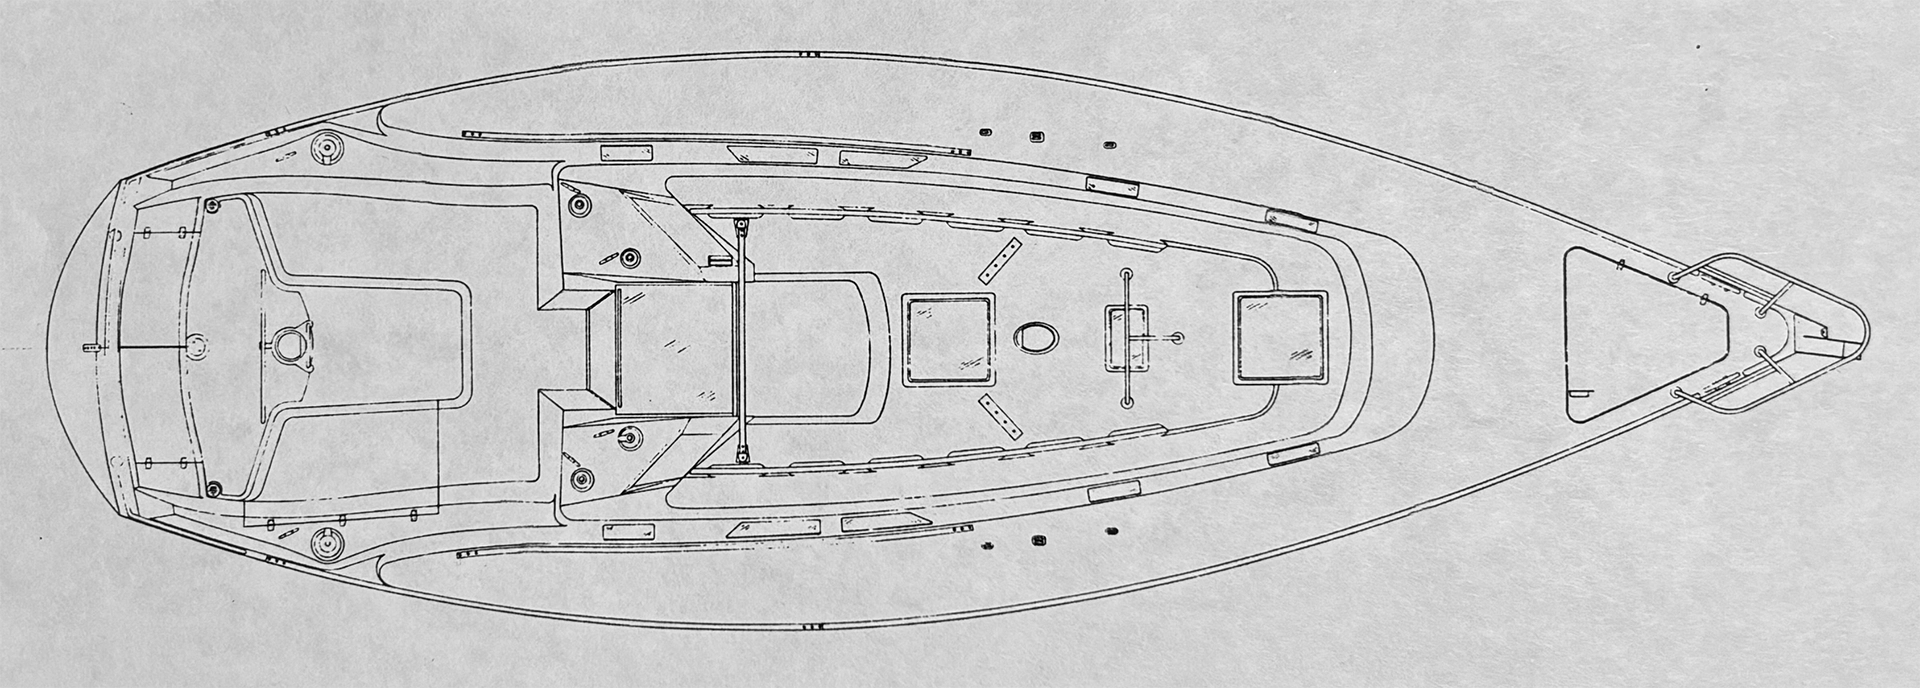
The deck is balsa-cored on all horizontal surfaces, except where plywood is used in higher stress areas such as stanchion and winch mounts, genoa tracks, mast partner, cockpit sole and hatches. Supplemental layers of roving and undirectional roving have been applied in high stress areas such as the anchor well/foredeck area, mast partner, companionway entrance, etc. The deck design is clean and functionally proportioned, incorporating a reasonable balance between cockpit and cabin dimensions. The cockpit is "T"-shaped to accomodate wheel steering. A molded, contoured helmsman's seat provides "locked-in" comfort port and starboard for upwind steering, and an excellent vantage point on center for good visibility downwind. Lazarette storage is located beneath the seat to starboard and a propane locker is molded-in on the port side. All seat edges are bevelled and cockpit coaming seatbacks cambered for comfort when heeled or upright.
The cabin top handrails are mounted on bases which are molded into the cabin top at the transition of the cabin top the raised center section. The resultant assembly resists torquing and provides plenty of bedding surface between the handrail and the bosses.
The exterior finish is a color-pigmented resin known as gelcoat, 15-20 mils thick.
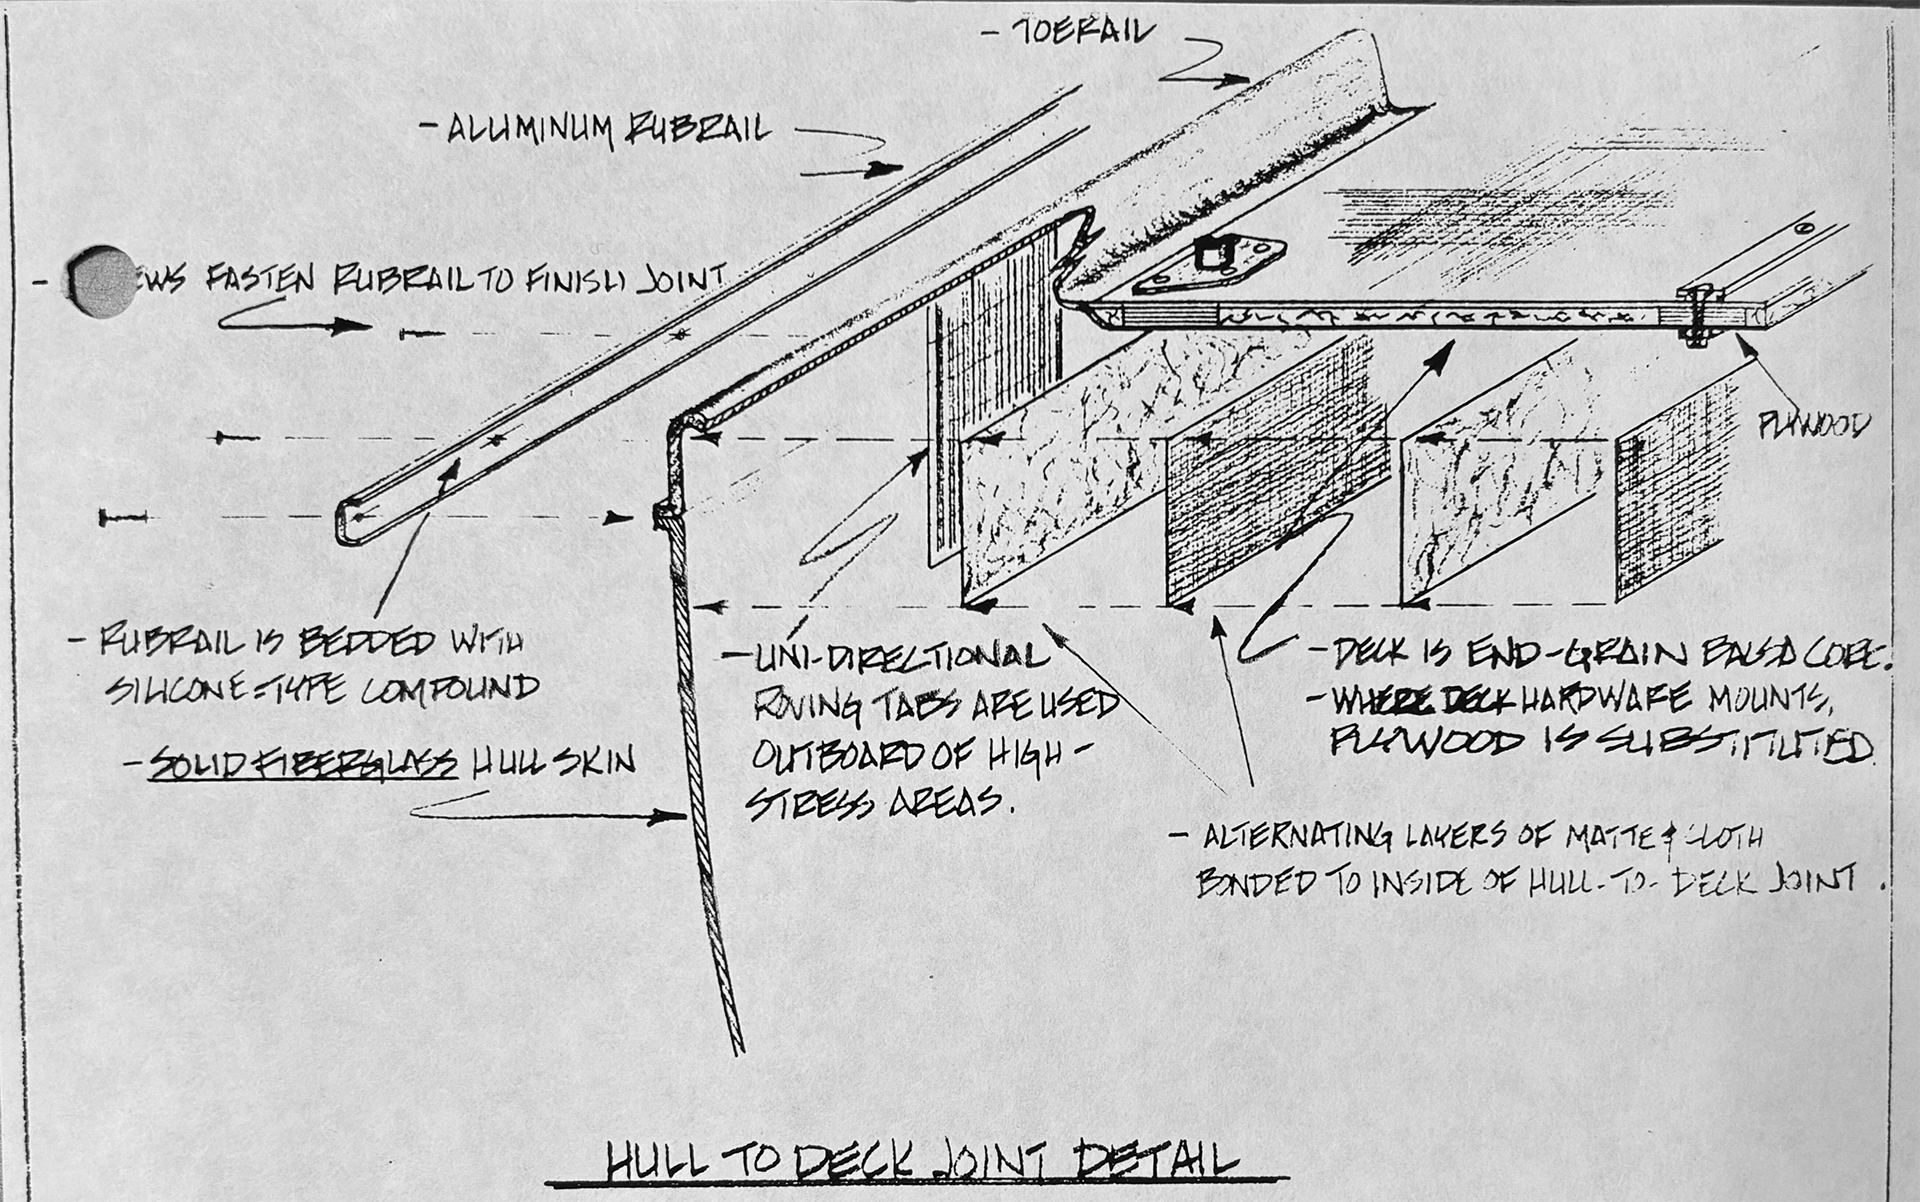
The deck is bonded to the hull using an interior fiberglass joint constructed of alternating layers of fiberglass cloth and matte. The hull-to-deck joint is finished off on the exterior with a functional aluminum rubrail. Matte and unidirectional roving are used in key stress areas, including the stem, chainplates, genoa tracks, etc. (See diagram on the following page).
Each Ericson 34 is identified by an individual "Hull Identification Number" (HIN), which appears on the starboard upper corner of the transom and also on top of the port engine bed near the forward end. The first three letters, "ERY", designate the manufacturer, Ericson Yachts. The next two numbers, "34", designate the model and the following three numbers are the hull number. Following the hull number is a letter which corresponds to the month of manufacture where, A=January, B=February, C=March and so forth. The first of the last three numbers is the last digit of the calendar year in which your boat was built and the last two numbers represent the model year.
1.2 Triaxial Force Brid Floor System
The structural backbone of the Ericson 34 is the latest generation of the Ericson Yachts Tri-axial Force Brid System (TAFG). The TAFG is a hand laminated unit with multiple load-bearing, indexing and maintenance functions. Use of the TAFG provides high strength and stiffness without using core sandwich construction on the hull skin. Core material can, in some cases, provide a path for water to work its way between the inner and outer fiberglass skins of the sandwich, causing delamination. Ericson's solid fiberglass skin construction has lead to the Ericson Yachts 10-Year Hull Warranty, a copy of which is contained in this manual. The extensions of the TAFG provide finished surfaces in all storage areas.
Deck Plan
Hull to Deck Joint Details
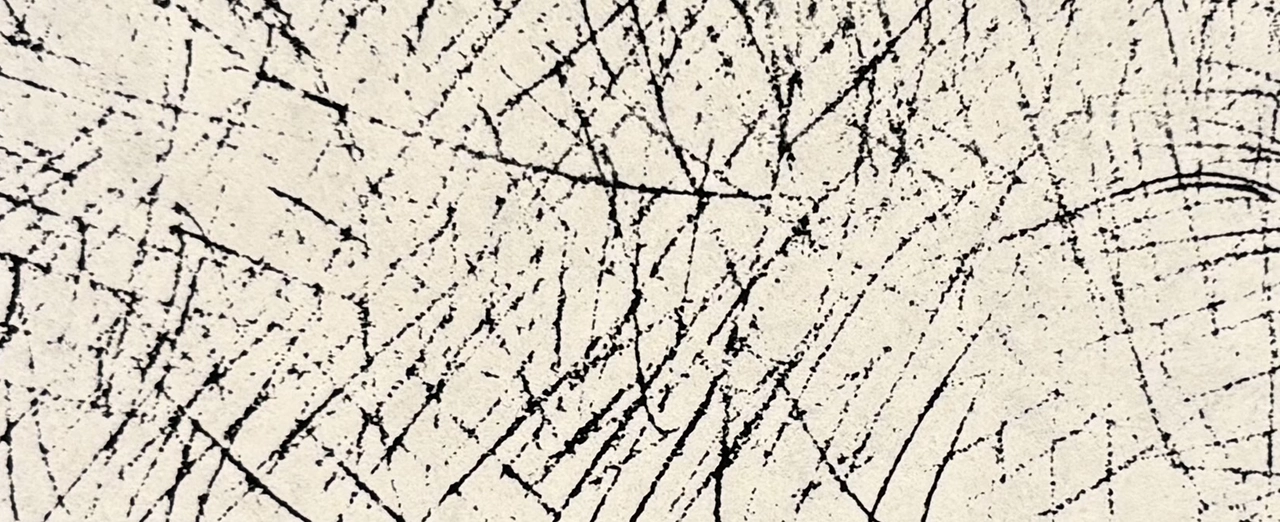 Matte: Random fiber "weave" creating smooth texture when laminated. Has least strength but excellent for use on outside surface to prevent texture of woven fabrics from showing through. Very good as binder between two heavily textured layers.
 Cloth: Stronger than matte with uniform wave of small bundles of fibers. Can be used near surface and lends strength to sharply radiwed corners. Preparing them for layers of stronger, less flexible layers of woven roving.
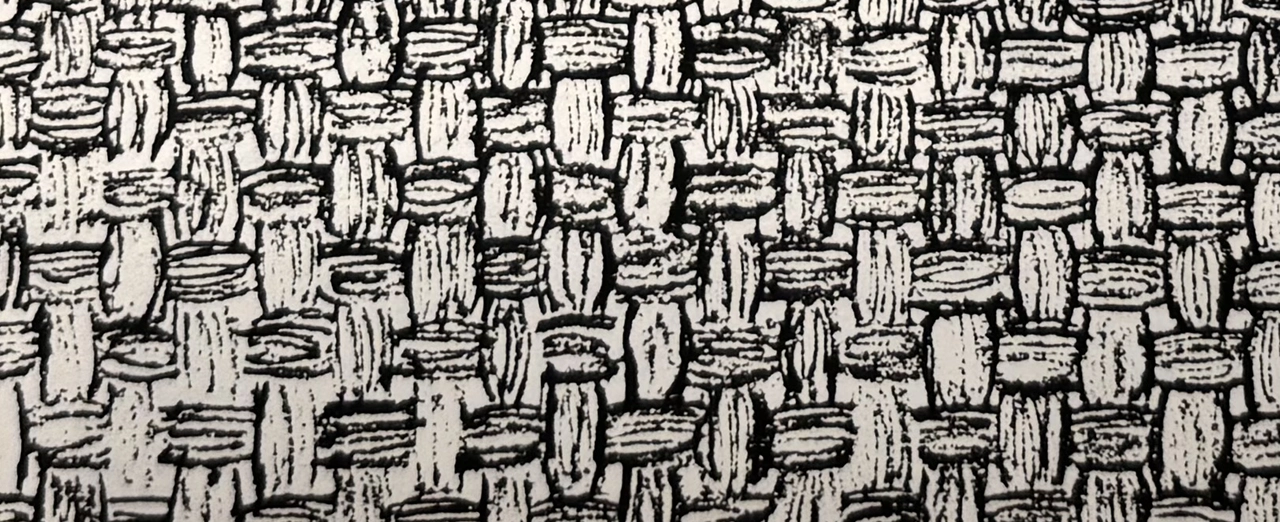 Woven Roving: Woven similar to cloth but with larger bundles of fibers. Used where material build-up and strength are required, ie. hull skin, generally and local reinforcement where extra layers through keel post-rudder post.
 Unidirectional roving (UDR): Consists of large bundles of fibers running in one direction held together with smaller fibers acting as a "binder." May be oriented to specific load requirements in laminate. "Wrapped" inside hull where rig loads hull.
The TAFG is composed of hand-laminated applications of matte, cloth, roving and uni-directional roving with a gelcoat-finished surface, molded on its own mold and bonded to the hull skin before the hull leaves the mold. Since the TAFG adds structural rigidity to the hull, this is the first stage of the tolerance control process. It is bonded to the hull all around its perimeter and interior cutouts with fiberglass cloth and also pressure bonded in the keel fillet area. Finally, the keel bolts are fastened through it. Since the TAFG adds structural rigidity to the hull, this is the first stage of the tolerance control process.
Uni-directional roving (UDR), is used in the floor beams and around the chainplate terminal bosses of the TAFG to maximize the strength-to-weight ratio of the entire structure. (see the illustration on the following page for an explanation of the types of fiberglass material used in construction).
The TAFG functions in the following ways:
- stiffens the hull longitudinally
- supports mast compression loads
- accepts rig tension loads
- distributes keel loading
- provides accurate alignment and support for the engine
- locates and provides anchoring for interior bulkheads and furniture
- locates and provides conduit for plumbing and wiring
- provides baffled sumps for bilge and shower water, and containment of engine fuel and lubricants
- provides a gelcoat finished bilge surface for easier cleaning and maintenance
- provides clean and organized locker areas beneath bunks in the cabin and lockers beneath the cockpit
The overall effect of the TAFG is to enhance the sailing characteristics, simplify maintenance, and increase the durability of your Ericson 34.
Since the hull is quite stiff longitudinally and mast compression loads are transferred to the same members which take rig (shroud) tension loads, the rig can be tuned more accurately, the headstay will be more effectively tensioned, and sailing performance is improved, especially to windward. For rig tuning instructions see Section 6.2.
1.3 Keel
The keel is 5200 pounds of cast lead containing 48 antimony for hardness. It is attached to the hull at the Tri-axial Force Grid floor system by 12 stainless steel bolts attached to a frame which is cast into the keel (8 are 1", 4 are 1/2"). The TAFG and keel boss fillet radius distribute the keel loading over a wide area of the hull adding to the structural integrity of the keel attachment point and minimizing the harmful effects from loadings which occur at the keel ends as a boat moves through the water or is grounded. Even though firmly attached, a small crack may appear between the keel and the keel boss on the hull. This occurs in the fairing material and may be refaired annually at haulout time if desired using an epoxy filler or, filler and fiberglass cloth.
Keel configurations available:
- Standard keel - draft 6'-2"
- Shoal keel draft 4'-11"
The keels are designed to NACA section 65-012. If templates for accurate keel fairing are desired, they can be generated from the information regarding this section in "The Theory of Wing Sections", a book that can be found in some libraries or, the technical or engineering section of many bookstores.
1.4 Rudder
The rudder is constructed of a high-density foam core sheathed with a fiberglass skin. A stainless steel web in the rudder center attaches to a large, 3-1/2" stainless steel tubing, rudder post. A bronze sleeve where the rudder shaft enters the hull and a bronze flange under the cockpit sole provide support bearings for the rudder post. Grease fittings are installed in each of the bearings. For maintenance and cautions concerning the rudder, please see section 1.11.2.
1.5 General Exterior Maintenance
The fiberglass gelcoat surface is highly resistent to the natural elements of the marine environment but, some care and maintenance is required to keep your hull and deck in a clean and attractive condition. In addition to the sun, salt and other natural elements in the air, waterbourne solvents and particulates are also present and potentially harmful to the exterior finish.
Since the gelcoat surface is somewhat porous, these substances can be absorbed, sometimes causing permanent stains. A good coat of paste wax will help prevent this from happening and provide an attractive luster to the hull. Marine fiberglass waxes are available at your local chandlery.
CAUTION: DO NOT WAX THE NON-SKID OR OTHER HORIZONTAL SURFACES ON WHICH PEOPLE WALK. IF WAXED, THE DECK WILL BECOME SLIPPERY AND DANGEROUS TO WALK ON.
Cleaning fiberglass surfaces should be done with the mildest product that will do the job. Soap and detergent are products to start with. Avoid using gritty cleaners unless absolutely necessary. Only use acetone, kerosene and other solvents when absolutely necessary. Acetone can actually work to dissolve the surface finish, especially if used excessively or allowed to puddle.
CAUTION: DO NOT USE SOLVENTS OR CLEANSERS ON THE LEXAN OR PLEXIGLASS HATCHES OR PORTLITES. ALSO, AVOID USING BRISTLE BRUSHES ON THESE SURFACES SINCE THEY MAY CAUSE SCRATCHES.
Years of exposure to sunlight and caustic substances will cause the gelcoat to oxidize. Keeping the surfaces waxed will minimize this condition. A nearly original luster may be restored by using a rubbing compound (obtained through your local marine or auto parts store), applied with a buffer or by hand. If you do use a buffer, make certain that the grade of compound is suitable for machine use. This type is usually of a finer grit than hand rubbing compound. If you are to use an electric buffer, try to undertake the project on dry land or use the utmost caution.
ELECTRIC SHOCK COULD RESULT.
Do not rub any more than is necessary, especially with a machine, since the abrasive compound may rub through the gelcoat.
Apply a coat of wax immediately following the rub-out. You will see that the time and effort is well spent.
On a practical note: Red wine spills may stain the gelcoat - the alternative is up to you.
1.6 Repairs to Fiberglass Surfaces:
1.6.1 Minor Scratches
Scratches which do not penetrate the gelcoat may sometimes be removed by rubbing them out with a compound in a more concentrated manner than for general shine restoral, described above. If this is insufficient, a rub-out with 600 grit wet-or-dry sandpaper will help "feather-in" the scratch. Follow by a rub-out with compound and a coat of
wax.
1.6.2 Minor Scratches Penetrating the Gelcoat, and "Crazing"
"Crazing" is a cosmetic condition of superficial cracks resulting from stress concentration, flexing, or impact. It is ususally found near corners but, may be found anywhere in the gelcoat. The deck of your Ericson 34 has been designed with generous curves in all corners to minimize stress concentration and, therefore, crazing, not ba
Where crazing or a scratch has occurred, try filling with an application of gelcoat, available in a patch kit from your Ericson dealer or the Ericson Yachts' Customer Service Department.
Gelcoat, as you receive it, is uncatalyzed. In order for it to harden and dry, a catalyst (MEK peroxide) must be added. Just a few drops per once of gelcoat, after the gelcoat is thinned, will harden it. Too much MEK will reduce working time until insufficient time remains for application. MEK peroxide can be obtained through your local chandlery.
CAUTION: USE GREAT CARE IN HANDLING BOTH GELCOAT AND CATALYST, SINCE, BOTH ARE POISONOUS AND IRRITATING TO THE SKIN.2
Suggested gelcoat application and finishing techniques follow:
If a filler material is required to bring the scratch repair flush with the surface again, many good and easy-to-use polyester fillers are available for this purpose, however better long term results might be attained by using an epoxy filler. Although someone more difficult to work with clear the epoxies are less prone to cracking and shrinkage.
Use a light-colored filler, if possible, since it will be easier to cover with gelcoat. A product such as "Bondo" (polyester and talc mixture) will do nicely if a lighter-colored filler cannot be found. If the scratch is a deep one, several coats of filler may be required. A light sanding between each coat will improve both adhesion and fairness of the filler.
Many professional fiberglass repairmen will mix a combination of polyester resin, glass "beads" (a powder-like material), and ordinary talcum powder to create a polyester filler paste which is light in color and relatively easy to pigment. Pigmenting this mixture with gelcoat will provide a good color base for the gelcoat finish. Proportions in the above mixture will vary depending on personal preference but, developing a filler of a paste consistency is desired.
After the filler has "set-up" (usually requiring several hours curing time), sand until fair with 220 grit wet-or-dry sandpaper. Set-up time will vary with temperature but, usually takes several hours to cure. Do not attempt to make a repair unless the surface temperature is approximately 65 degrees. A heat lamp will help on colder days. the softwand, peading will
CAUTION: EXTREME CARE WHEN USING ANY ELECTRICAL TOOL OR OBJECT NEAR THE WATER. DANGEROUS ELECTRIC SHOCK MAY RESULT FROM IMPROPER USAGE.
Do not heat the surface any warmer than necessary, since blistering of existing fiberglass, as well as the repair could result.
Gelcoat itself will not cure in the air. A surfacing agent (special wax) must be added or, polyvinyl alcohol (PVA) must be sprayed over the repair. Plastic food wrap, such as Saran Wrap, can also be laid directly over the top of the wet gelcoat to seal it from the air instead of wax or PVA, if the repair is just a few square inches. Using the plastic wrap will both cure and smoothen out the new gelcoat, if carefully done.
Application may be either with a brush or with a freon spray gun, such as the "Spra-Tool", found at hobby and automotive shops. If gelcoat is to be sprayed, add styrene to the gelcoat to thin it to a consistency of light oil. Add a lesser amount if it is to be brushed. Remember to thin before adding the catalyst. Acetone may be used as a substitute for styrene but the long term color results of the repair may not be as durable.
After the new gelcoat has cured (usually 4-6 hours), remove the plastic covering or, wash off the PVA with water, and sand with 400 and then 600 grit wet-or-dry paper until smooth. Be careful not to sand through the edges of the repair. Follow with rubbing compound and a coat of wax.
Color matching is sometimes difficult, especially when repairing an older boat or darker colors. Usually the patch will fade into the surrounding area with time.
1.7 Teak Care and Maintenance
The hatch boards and handrails are made of solid teak. Teak has an abundance of natural oil, making it one of the most durable of woods and, ideal for use in yacht applications. However, aging may cause some splitting and graying. Proper care will help prevent this and maintain a richer-looking golden brown color.
One of two methods for preserving a new looking finish may be used, each producing a different effect:
- Cleaner and Sealer: A two-step treatment utilizing a cleaning and bleaching agent applied with a brush or sponge followed, after rinsing and drying, with a sealer. The sealer may be ah mixture of oils and resins. This method is easiest and least laborious. Be sure to thoroughly rinse bleach off fiberglass surfaces to avoid bleaching the gelcoat.
- Varnish: Varnishing will produce a glossy, durable finish on teak as on most woods, but application and maintenance requires more time and care.
1.7.1 Cleaning and Oiling
Your Ericson 34 comes to you with the teak already sealed with several coats of oil. You may wish to supplement these by cleaning with a simple, one-part teak cleanser, such as "Teak-Brite", followed by an application of a teak finish. Many brands are available.
When cleaning, a scrub brush, sponge or plastic "3M" pad may be used. Do not use steel wool, since the filiments will break, settle on the gelcoat and cause rust stains. Scrubbing hard in the direction of the grain will remove some of the softwood in the teak so, let the chemicals do the work and scrub as lightly as possible. If scrubbing does remove the softwood, sanding will restore smoothness to the surface. Be sure to rinse the cleaner well, since allowing it to remain on the fiberglass may cause some bleaching or discoloration. Allow the wood surfaces to dry. Applying the sealer and oil finish to damp wood will not let the sealer penetrate. Application may be either with a paint brush or clean cloth. If dry spots and uneveness in texture appear after the sealer has been applied, chances are that the sealer was applied while the wood was still damp. Simply allow longer drying time and reapply the sealer or oil.
On older teak that has greyed, a stronger cleaner and bleaching agent, such as "Te-Ka" or "Tip-Top-Teak", will probably be required. These are two-part products using cleaners and brighteners. Great care and plenty of rinse water should be used during application, but they do an excellent job of restoring weathered teak.
1.7.2 Varnishing
In preparation for varnishing, any finish oil treatment should be removed with one of the two-part cleaners described above. Next, sand smooth with 120-180 grit sandpaper. Apply a varnish sealer compatible with the varnish you choose. With a good quality brush, apply 3-4 coats of varnish allowing drying time between coats as recommended on the can. Be sure to use a good quality varnish, since revarnishing time will come around soon enough (approximately every four to six months).
Covering the varnish work when your boat is not in use is highly recommended. You or your dealer can find a good canvas shop to make covers to fit hatch boards and just about anything else.
1.7.3 Removing Oil and Varnish from Fiberglass
Whether varnishing or oiling your teak, try to avoid getting either substance on the fiberglass. As mentioned above, the surface is somewhat porous and a tough stain may result. Extra time spent masking the fiberglass next to the wood parts to be oiled or varnished may save on clean-up and prevent staining problems.
Teak oil is particularly troublesome if it is allowed to stain the fiberglass. If this does occur, use very small amounts of Te-Ka on the stain area with a brush, rinsing frequently. The stain should lift out. Be careful not to let any Te-Ka remain. If Te-Ka cannot be found, there are other products now available for stain removal on fiberglass, most of which have oxalic acid as the common ingredient, also the active agent in the teak cleaners.
As always, refer to the instructions and cautions written on product containers, since many of the products referred to are caustic.
1.8 Rubrail Care and Maintenance
The aluminum rubrail on the Ericson 34 serves both aesthetically, in finishing the hull-to-deck joint and, functionally, protecting against the inevitable contact with a piling, seawall or another yacht.
Cleaning the aluminum is simple, since it is resistant to most cleaners, but remember that it is easy to drip cleaners onto the fiberglass. Acetone and milder cleaners are recommended. Do not use bronze wool to apply any cleaners. Corrosion can result from contact between the two materials if filiments of the bronze remain on the aluminum.
If the rubrail is severely damaged, it may be replaced with relative ease. To order a replacement, contact your dealer or Ericson Yachts.
1.9 Lifelines, Stanchions and Pulpits
Some of the most depended upon and, proportionately, least inspected components of deck hardware are the pulpits, stanchions and lifelines. Extra care and maintenance devoted to them could easily prevent injury or a crewmember overboard.
General care for the stanchions and pulpits is primarily cosmetic, consisting of cleaning and an Occasional application of "Nevr-dul" to preserve the shiny finish of the stainless steel. Even stainless steel is subject to some rusting, especially in a salt and solvent laden environment. Nevr-dul will both clean and leave a rust inhibiting film. While applying it, you will have the opportunity to check all welds, setscrews, and parts for cracks or fractures caused by constant working from people and lines bearing against them. There have also been cases of fractured welds and damage suffered as a result of unreported collisions while the boat is moored.
Lifelines should be inspected periodically for broken strands, particularly where they enter terminal fittings. The terminal fittings themselves should be checked for cracks. Pressure caused by oxidation from moisture in the wire strands and fittings may, with age, form tiny hairline cracks. Replacing lifelines every three to four years is good preventative maintenance.
Cleaning will make cracks more visible and a magnifying glass will help too. If you are in doubt, replace the suspected weak link. Also, check lifeline turnbuckle locknuts and keeper pins to be sure they are properly secure. There are many documented cases of failed lifelines on sailboats.
Since stanchions, in particular, are subject to a variety of loads, they may, from time to time, break the caulking seal resulting in a water leak. Simply unbolt them, clean off the old compound and reseal with any good pliable sealer, such as Boat-Life's "Life-Caulk" or 3M's "5200". Silicone sealants are not recommended for this application. Zipper access has been provided in the soft headliner on the underside of the deck to make access to nuts and bolts easy.
1.10 Troubleshooting and Repairing Leaks
Although your Ericson 34 has been designed and engineered to prevent leaking; working, flexing, and aging of caulking compounds may produce leaks, as will happen on any yacht. Although a nuisance, the task of tracing and repairing a leak is not all that uninteresting.
Much thought has gone into the interior of the Ericson 34 to make hardware and other fastened components easily accessible for maintenance. Zippers in the headliner are just one example.
If a leak source is not immediately apparent, some helpful guidelines for tracing leaks follow.
With a hose running slowly, start at the lowest point that could contribute to the leak and allow the water to run in that area for 10-15 minutes. The time depends on how much water is noted from the leak in sailing or rainy conditions. For example, if water appears to be coming in from the area of the sheer (where the hull and deck meet), the lowest point is outboard of the aft end of the aft main portlite (window). Water could be coming from a stanchion somewhere forward or aft of this point and running to the low point. The presence of liner zippers here is particularly helpful.
NOTE: A leak at the hull to deck joint is highly unlikely.
After checking along the sheer, work inboard and to points up the cabin side. When the source of the leak is determined, remove the fitting. Carefully clean the surface of the fitting and the deck with a putty knife and, if need be, use a sparing amount of acetone.
Caulk the deck liberally so that when the fitting is bedded, some compound will squeeze out. Also, be sure to add caulking compound to the upper threads on each fastener, otherwise water may travel down the threads. Masking tape applied to the deck surface around the perimeter of the fitting will aid in clean-up. Acetone may be used to clean up polysulfides after excess is removed with a putty knife. Applying a cold water spray to the bead of caulking around the fitting will accelerate the skinning-over process for easier trimmming and cleaning.
Just a word of advice here - almost without exception, trying to stop a leak at a fitting without removing it and rebedding it, by caulking around its perimeter, will not be effective. The end result will be the addition of an unsightly mess to an aggravating leak.
1.11 Underbody Maintenance and Paint
Familiarization with the Ericson34 under body and underwater components is important in knowing exactly what needs to be maintained, including the rudder, keel surfaces and thru-hulls. In the event of fouling on anchor lines, chain, mud or other types of bottoms, thorough knowledge will enable more effective action to correct the problem.
Lifting sling marks should be placed unobtrusively near the rail so that, in a yard where the operators may not be familiar with your yacht, they may get the lifting slings in the proper spot, avoiding a bent propeller shaft, etc.
1.11.1 Bottom Paint
Your boat is shipped from the factory with one coat of primer and one coat of bottom paint as standard. It is preferable to have this annual cycle occur at the beginning of each spring to maximize seasonal sailing performance.
Between annual haul-outs, cleaning by a diver will keep performance-inhibiting growth off and keep you abreast of the condition of the shaft, strut, thru-hulls and zinc. We recommend a diver's inspection every three months.
1.11.2 Rudder Maintenance
Rudder maintenance is a relatively simple and, obviously, essential operation at haul-out time.
A. Check to make sure that there are no cracks or fractures in the fiberglass skin. If any exist, grind out the fiberglass in the area of the crack, allow moisture to dry out, and repair using fiberglass cloth and resin. Sand and follow with filler for fairest results. Water between the skin and the foam will heat up and vaporize or freeze when your Ericson 34 is in dry land winter storage and produce a large "star" crack in the outer skin. This can be repaired with light fiberglass cloth and resin.
B. Keep the rudder shaft greased. A good waterproof wheel-bearing grease will do. A "zerk" fitting is provided on the bearing plate under the cockpit sole and at the lower sleeve. (See illustration on page 3-10A).
C. Shaft play may increase over the years, as a function of wear. A good remedy is to disas- semble the steering cables, quadrant, (or rudder post cap, if fitted with tiller steering), slide the rudder out, and fit very small shims of teflon or some equivilent material. In the future, the condition of the shims may be checked at the annual haul-out. Keeping the wheel brake engaged when the boat is not in use will reduce wear on the shaft and steering system.
An alternate system of reducing play caused by wear, is to use the method of epoxy-injection prescribed by Gougeon Brothers, Inc., using "West System Epoxy. For further information on this process contact, Ericson Yachts' Customer Service Department or, Gougeon Brothers, Inc., 706 Martin, Bay City, Michigan 48706, (517) 684-7286.
D. Check the condition of the packing in the rudder shaft packing gland and replace if necessary. It will need replacing if water leaks in while under way after the two bronze flanges have already been adjusted together. (See Section 3.5.8-H)
E. Whenever your boat is hauled-out and the rudder is not being painted or worked on, it should be kept covered with cardboard or some other light-colored material which will shade and insulate it. Heat from the sunlight tends to build up inside the skin and sometimes causes blistering of the rudder's surface. If this occurs, repair with fiberglass cloth and resin as previously stated.
1.12 Corrosion Consideration and Zincs
Dissimilar metals develop different electrical potentials when immersed in an electrically conductive solution. For our purposes, this solution is any containing ions and minerals - salt water for example. In addition to the galvanic electrical currents created by these metals, stray electrical currents from other sources such as dock power lines, generators and battery chargers on other boats, even a damaged wire on your boat, may have a corrosive eroding effect on underwater fittings. Corrosion and deterioration by stray currents is called electrolysis.
All the metallic surfaces in contact with the water, including those of your engine raw water cooling system, propeller shaft, strut, and any metal thru-hulls, are subject to electrolysis. To prevent electrolytic and galvanic destruction, a zinc collar should be installed on the propeller shaft.
In essence, when corrosion takes place, these metals are "giving up" electrons, undermining the integrity of the metal. This phenomenon shows up as severe pitting and, in more advanced stages, crumbling of the material. Bronze turning to a pink to pinkish-orange color is evidence that some corrosion has taken place. The zinc will give up its electrons (material), more easily than the bronze, and will corrode first. The zinc will become, and is known as, a sacrificial anode.
The standard thru-hull fittings and seacocks used by Ericson are manufactured from a material called "Zytel", a very hard, durable plastic which is impervious to corrosion.
Since the rate at which the zinc deteriorates will vary depending on many factors, it may well disappear before the annual haul-out. Therefore, it is highly recommended that its condition be checked periodically by a diver. The fee for checking and replacing a zinc would be a small fraction of what repairs from corrosion damage might be. The protection and peace of mind will be worth it.
1.13 Deck Hardware Maintenance and Installation
As the scope of your experience with your Ericson 34 widens and your particular needs are determined, you may want to install additional deck hardware and accessories. In most cases, this is easily done. Be sure to consider the requirements of the fitting loads, compatability with existing functions, and proper fasteners and backing plates.
Included in this manual are drawings suggesting additions to the standard deck layout. Shown are ideas on leading the reefing lines aft and adding spinnaker gear. A blank deck plan is also included to be copied as a worksheet for your own plans. You can also consult your dealer for help.
When installing hardware, reference to our general layout plans will give you a good idea of locating fittings where thru-bolting may be done easiest. The final location should be determined by unzipping the headliner and checking for wiring, trim or other components which might be damaged when drilling. When drilling through in areas where the headliner cannot be pulled for enough away to avoid the risk of damaging it with the drill or other sharp object, lay a piece of firm material such as 1/4" plywood or thick cardboard between the deck and liner to protect it.
Wherever fittings are bolted through the deck (as most should be), a backing plate of aluminum or stainless steel is recommended to avoid fracturing the interior fiberglass surface. A fitting which is "backed" is less likely to flex and become a future leak or cause damage to the fiberglass and core around it. Be sure to use enough caulking compound in the manner described in section.
Conclusion
Great satisfaction can be derived from rigging your Ericson to suit your personal needs, and frustration can be avoided by consulting our layouts and your dealer. Also bear in mind that, if you anticipate future hardware additions, it is wise to take the time to sketch a master deck plan in order to avoid, as much as possible, moving existing fittings. Use the deck plan in this chapter as a guide or to make copies from.
Once installed, deck hardware is fairly simple to maintain. While winches should be taken apart and properly cleaned and lubricated, most of the hardware, (including the winches between lubrications), will benefit from a good direct rinsing with fresh water. Parking lot dust and other airborne particulates work into the bearing surfaces as well as salt residue.
A word about winch maintenance: Manuals are available from the individual winch manufacterers (Barient or Lewmar). They contain suggested maintenance schedules. In any case, for good basic performance from your winches, clean and lube them at least twice a season. Servicing them less frequently can lead to early parts replacement or winch failure, a potentially dangerous situation.
Follow the recommendations of the manufacturers but, in general, try not to over lube your winches. Use grease on gears but, use oil only on the pawls. If excessively applied, lubricants will run out on the deck when the winch is doused with water.
Note: Teflon greases are not recommended for use inside aluminum drum winches. Some Teflon greases will promote galvanic action and cause corrosion of the drum, drum bearings and spindle unless the winches are cleaned and lubed as frequently as once a week.